Remember the Blue Screen of Death (BSOD)? I’m sure everyone remembers it. Unfortunately, if you have seen a red tint background, there is also a Red Screen of Death Error on Windows 10/11 too! This tutorial will show you 6 different methods on how you can fix RSOD on Windows PC without causing any further damage to the hardware or software.
When such an error displays on your system, then you cannot do anything and are forced to restart your system. The system to crashes without even showing any error. This error comes with the ability to damage your system completely.
It can be encountered while playing games, watching videos, booting your system, entering login passwords, updating to Windows 10, at the startup, or at any time when you are doing nothing.
NOTE: Please do not panic and worry; this is NOT a virus warning that you see and merely a straightforward issue that can be solved easily with the solutions listed below.
Contents
What is RSOD? General Causes of Error
- This is a very common fatal error that occurs due to an application that is unstable. It can be fixed with a bit of luck, patience, and troubleshooting.
- Most of the time, this error is deemed to be caused due to a hardware error, especially when the user overclocks his PC or Laptop.
- It is also caused by outdated or incompatible drivers or due to BIOS issues.
- It may also occur due to graphic drive issues and matching apps installing the wrong files.
- The red screen startup error can also cause it.
- Hardware that is getting too old and is unstable.
Now we recommend you check for the monitor cables too, whether they are correctly connected or not or whether they are damaged or not.
6 Ways on How to Fix Red Screen of Death – Resolve RSOD Error Windows 10/11
Have you overclocked recently? System is unstable
Now, to begin with, what is overclocking? Well, it means to modify the hardware clock rate, voltage, or multiplier in a way to get the best performance out of it. Along with the performance, it is also used to increase the CPU or GPU heat produced by it as due to overheating, the system’s hardware can be damaged.
Keep in mind that overclocking is not for beginners, as it can harm your entire system. Use this to get rid of the RSOD error.
RELATED READ: How to Overclock your Graphics Card for Better Performance.
Uninstall any recent software you installed
Now there are some applications due to which people face this error. If you have recently installed any new app and started facing this error then
- In the first step, you need to go to the PC setting window, and under the advanced startup section, you need to click on restart now.
- For now, you have entered into the safe mode.
- In this mode, you need to verify which app is causing the error.
- After this, you need to go to the control panel.
- Then go to programs and install the program.
Now it is also seen from a report that uninstalling the softOSD.exe software can also fix the error. So, you need to check if you have got this software installed then uninstall it right away from your system or laptop. For this, you need to follow the steps below:
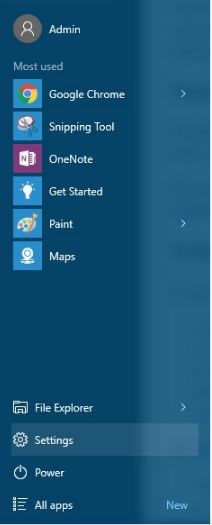
- In the first step, you need to click on the start button and hit settings.
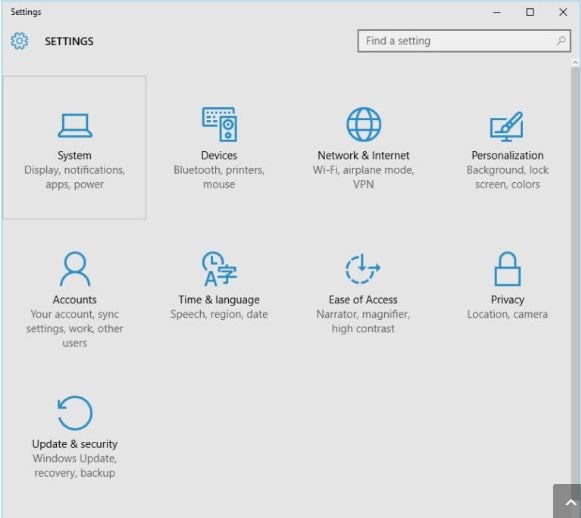
- Then click on the system:
- After this at the left pane, you need to select applications and features.
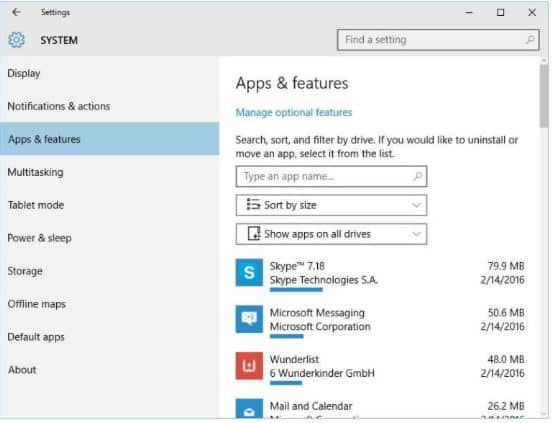
- You need to click on softOSD, click on it, and then hit the uninstall button.
- Now is a message that appears to remove sds64a.sys, skip it simply.
There is another way to uninstall it as well.
- In the first step, the type control panel in the search bar and select control panel there from the list.
- After this, you need to select Uninstall a program.
- Now you shall get a list of the uninstalled programs; you just need to find softOSD and double click on it.
- Now you will get a message to “remove ss64. a”, just skip it.
Follow the steps above to uninstall the softOSD software; uninstalling it manually shall not altogether remove it. Some traces are left behind that can cause future issues.
RELATED READ: Fixed: Failed to Enumerate Objects in the Container Error in Windows 10.
Check for an update on your BIOS
The error is also generated if you have an outdated BIOS or UEFI. Thus you need to update it as soon as possible to save yourselves from such problems in the future. This can also depend on the age of your computer as older BIOS cannot be updated.
A small guide for upgrading BIOS:
If you think you can update BIOS/UEFI easily, then you may want to think again. It is tough for beginners, as a little mistake can lead to permanent damage to your system. For this, you need to follow the steps below:
- In the first step, you need to visit your motherboards manufacturer’s site.
- From here, download the latest version of BIOS/UEFI.
- Now, most of the websites carry a guide on how to update the BOIS, just follow the steps on it carefully.
RELATED READ: How to Fix Error Printing Message on Windows 10 (Easy Solutions).
Update Graphics Card Drivers – Keep settings default
Now, this is a go-to solution for most of the users and is used to fix the RSOD error. Now, if you switch back to the default graphic card driver on an HP laptop is used to fix such an issue. Now for other users reverting to default graphics card drivers may also work. If you are having difficulties updating, we have a useful guide on Nvidia Control panel issues.
For this, you need to follow the steps below:
- In the first step, you need to go to the search bar then type device manager.
- Then from the list of results, you need to select the device manager.
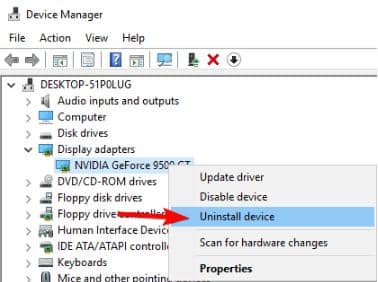
- Then you need to find the display adaptors section and expand it.
- Then in here click right on your device and then from the list select uninstall.
- After this, you need to check to delete the driver software for this device and then click on uninstall.
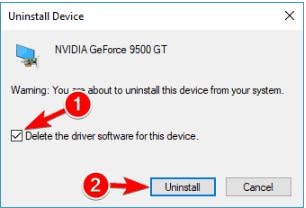
- As this gets removed, you need to restart your system.
Now it is also recommended that you update the graphics card drivers as well. For this, you simply need to go to the manufacturer’s site or Microsoft’s official website, and from there, download the latest driver for your graphics card.
RELATED READ: How to Repair and Reinstall Microsoft Store via PowerShell in Windows 10.
Edit the “settings.ini” file – Not a common solution
Many of the users have reported that this issue is caused due to the Battlefield: Bad Company 2 game. Now to resolve such a problem, you need to change the game’s settings.ini file. For this, you need to follow the steps below:
- In the first step, you need to open documents then the BFBC2 folder.
- Once there, you need to find the settings.ini file.
- After this you need to find the following line:
DxVersion=auto and change it to DxVersion=9
- Save in all the modifications and try re-running the game.
Last resort: Windows Automatic Repair Tool
Now if any of the methods mentioned above did not work for you, then you can try using the windows repair tool as this is used to
- With the help of these users can fix viruses or malware, hardware failure, windows file corruption, registry corruption, and much more.
- This is also used to optimize your system’s performance and make it error-free.
For this, you need to follow the steps below:
- In the first step, you need to install and press the scan button.
- This shall then automatically fix all the issues as well as errors.
Download Windows Automatic Repair Tool
More Fixes and Troubleshooting tutorials:
- How to Fix Sedlauncher High CPU Usage Error in Windows 10.
- Fixed: Kernel Security Check Failure Error in Windows 10 (Best Method).
- (Solved) Error Code 66A in Windows 10 Microsoft .NET Framework.
Last Words – Are you still experiencing a red tint?
This is, without a doubt, one of the scariest errors we have seen in a while. I hope you have now fixed the red screen of death error on your Windows PC. RSOD has also been known to show up on game consoles such as PlayStation 2, PlayStation 3, and Xbox.
Do let us know in the comments below if you have managed to remove the red screen tint/background, and which steps you had followed.


