
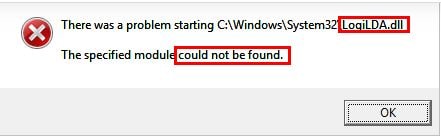
You come with many errors when you are working on your computer system. One of them is the logiLDA.dll not found or missing. If you see another message that says “There was a program starting C:\Windows\System32\logiLDA.dll”. The specified module could not be found. We know that viewing such error messages makes one feel annoyed, but you are not the only person to come across this.
Today, you will learn how to fix LogiLDA.dll error and make your Logitech mouse work again. This issue has been reported by millions of users out there. The most important thing to note here is that you must know how to fix such a problem by downloading the LogiLDA.dll file.
Contents
What is LogiLDA.dll and why do I get an error?
It is a window DLL meaning Dynamic Link Library file. The LogiLDA.dll file is a software component of the Logitech Download Assistant. The .dll file is found and located in the C:\Windows\System32folder. It contains the following things:
- The program code
- The program data
- The resources of Logitech download assistant
During the startup process, the Logitech download assistant will run to see and check for the newly released updates of Logitech.
How to Fix LogiLDA.dll Missing Error and make your Logitech Mouse work again
There are many methods in which you can get rid of the .dll error. We shall discuss each way for your benefit. These are as followed:
Disable logiLDA.dll from Startup Options
You can disable the .dll error by disabling it from the startup in the task manager. The only thing that you sacrifice here is that when you disable it from the task manager, then the Logitech download assistant will not run during startup to check for the newly released updates of Logitech. So such a little sacrifice will not harm your computer system. You need to follow the steps to this:
- In the first step, you need to press Ctrl, Shift, and Esc from the keyboard to open the task manager. A prompt will occur. Hit the ok button
- Now locate the startup tab. You need to click right on the Logitech download assistant
- Now select disable to disable it from the startup
- After this restart your computer system
After this method, check to see if such an error prevails. If yes, then you can try another way.
SEE ALSO: How to Fix any Problem Related to Windows 10/11 Startup Folder.
Restore.DLL Files
You can also fix the issue by restoring the .dll file form a particular source that is trustworthy. However, if you are not sure what software to trust, then we recommend that you try the DLL-files.com Client. This will help you to solve your problems in a single click. For this, you do not need to worry regarding downloading any wrong file or which version of the windows system is running there on your computer system. The DLL-files.com Client is capable enough to handle all this for you. For this, you need to follow the steps:
- In the first step, you need to download the DLL-files.com Client
- Once downloaded you are required to install it on your computer system
- Now run the Client on your computer system
- In the search box type logiLDA.dll and then search for the DLL file button
- Click on LogiLDA.dll
- When you hit the install button, then you are asked to register the program way before you can install the file. You will be prompted when you click and install it on your computer system
After following this method, check and see if the issue exists. If still, the problem prevails, then you can try another way as well.
SEE ALSO: How to Remove Your Phone App (YourPhone.exe) from Windows 10/11.
Uninstall and Reinstall Logitech Setpoint software
There are chances that the Logitech setpoint software causes such an issue. So here is what you can do. If Logitech setpoint is installed on your computer system, then you can try to uninstall it and see whether the issue reappears or not. For this, you need to follow the steps:
- In the first step, you need to press the Windows logo key and R simultaneously on your keyboard for the run dialogue to open. To open the control panel, you need type control and then hit the enter button.
- Now you need to click on uninstall program
- Then click right on Logitech setpoint x.x.x and then click on uninstall to uninstall it
- Now you need to restart your computer system
After performing the method if still, the problems exist then all you can do is try uninstalling and reinstalling your Logitech mouse drivers.
SEE ALSO: How to Fix WMI Provider Host (WMiPrvSE.exe).
Deleting the Logitech Assistant key from the Registry Editor
If the .dll issue reappears after you have disabled the logiLDA.dll from the startup, then you might need to remove the Logitech download assistant key from the registry editor. You need to follow the steps for this:
- In the first step, you need to press the Windows logo key and R simultaneously on your keyboard to open the run dialog.
- To open the registry editor type Regedit and press the enter button
- After a prompt shall appear for permission. Hit the yes button to open it
- You need to follow the path to locate the Logitech download assistant key
- For this, you need to click right on the Logitech download assistant and then click on the delete
- Now restart your computer system
After following the steps if such an issue still prevails then you can try to uninstall Logitech setpoint software.
SEE ALSO: How to Fix Sedlauncher High Disk and CPU Usage on Windows 10/11.
Uninstall and Reinstall your Logitech Drivers
If the methods mentioned above have failed to solve the .dll issue, then you can try to uninstall and reinstall your Logitech mouse driver. To do so, you can follow the steps:
- You need to press the Windows logo key and R simultaneously on your keyboard to open the run dialogue.
- In the search box type devmgmt.msc and then hit the enter button to open the device manager
- To expand the list, you need to double click mice and other pointing devices
- You need to click right on your Logitech mouse and select to uninstall the driver of your Logitech mouse
- Now restart your computer system. your PC shall detect the mouse and then reinstall the driver for you
After following all the steps if the problem still exists then reinstalling the driver may be the answer to your worries
You need to update the Logitech mouse to the latest version as a must. By doing this, you can exempt yourself from many PC issues. In two ways, you can update your Logitech mouse driver that is manually and automatically.
SEE ALSO: How to Open.RAR Files in Windows 10/11 with WinRAR, WinZip, and 7-Zip.
How to update your Logitech Devices
- How to update manually
You can manually update your Logitech mouse driver by visiting the official website of Logitech and searching for its latest update. You need to be sure to select such a driver that is fully compatible with your windows system.
- How to update automatically
You can update your Logitech mouse driver automatically as well with Driver Easy. You do not need to worry that what window you have, regarding downloading any wrong file or even making a mistake. You can download this either through free or the pro version of the driver easily. With the pro version, it will take only two clicks with full support ad a 30-day money-back guarantee. For this, you need to follow the steps:
- In the first step, you need to download and install the driver easily
- Now run the driver comfortable and then click on the scan now button
- The Driver Easy shall scan your computer system and detect for problem drivers
- Now you can click on an update that is there next to the Logitech mouse to download the correct version of the driver automatically and then you can install this manually.
SEE ALSO: How to Fix Error Code 66A When Updating Microsoft.NET Framework.
Download LogiLDA.dll File
If you are still getting the error again and again. Just manually download the LogiLDA.dll file and paste it in your Logitech folder. This file should work on Windows 10 1903 build.


