Arch Linux is an x86-x64 general-purpose Linux distribution. This is becoming very popular among DIY hardcore and enthusiasts users. This page will show you how to install Arch Linux in 2022 in a step-by-step guide. We will also cover how to configure Arch Linux partitions, file systems and live USB booting. The installation process includes only a small base system and expects the end-user to configure it and then use it. Arch Linux usually focuses more on elegance, minimalist system, code correctness and simplicity.

This is a complete Arch Linux install guide and the best on the web. The Arch Linux carries its package manager known as the Pacman. It also supports the rolling release model. It aims at providing a cutting-edge OS and never misses having an up-to-date repository. You can install it even on low-end hardware and then install only the required packages over it due to a minimal base system.
It is a prevalent OS for learning Linux. Give it a try if you want to experiment with a DIY attitude. Follow through the article to learn how to install and set up Arch Linux and then a desktop over it.
Before following the process, you need to make sure to keep your files backed up as this method is going to wipe off your existing OS and install Arch Linux on it.
SEE ALSO: Top 8 Ways on How to Secure your Linux Server (Linux Server Hardening Guide).
Contents
How to Download Arch Linux (Latest Version)
To install Arch Linux on your computer system, you need to follow the steps below
Arch Linux ISO File (32-bit/64-bit)
From the official website, you need to download the ISO. It requires an x86-64 compatible machine with a 512 minimum RAM, 800 MB disk space. Nonetheless, it is recommended to have at least 2GB of RAM and 20GB storage for the graphic user interface to work without any problem.
Download Arch Linux x86/x64 ISO
SEE ALSO: Top 8 Best Ubuntu 19.10 GTK Themes Download.
How to create an Arch Linux Live USB
For the ISO that has been downloaded, we have to create a live USB of Arch Linux.
You can use dd command to create a live USB if you are on Linux. You need to replace /path/to/archlinux.iso along the path where ISO file has been downloaded, and /dev/sdx with the drive (shown in the example below). Use the isblk command to get the device information
- dd bs=4M if=/path/to/archlinux.iso of=/dev/sdx status=progress && sync
You can create a Live USB using different tools on windows. We recommend you the Rufus tool.
SEE ALSO: Kali Linux Hacking Tutorial for Beginners – Learn to Hack.
How to Boot Arch Linux from Live USB
Once a Live USB has been created, you need to shut down your computer system. After this plugin your USB and then boot your system. Keep on pressing F2, F10 or F1 (depending on your system) while you are booting. The setting will open up. Here you need to select to boot from USB or removable disk. Once you click on this, you will see the following option
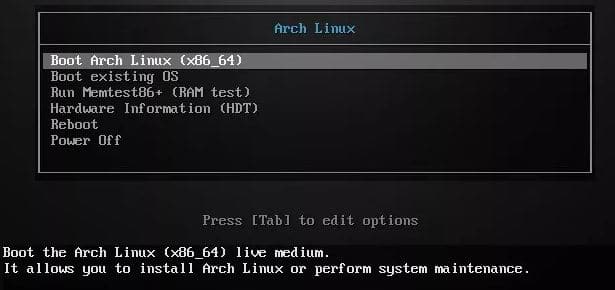
Now select boot Arch Linux (x86_64). After many checks, the arch Linux will boot to login prompt with the root user.
SEE ALSO: How to Install Software Packages in Kali Linux.
Partitioning Disks in Arch Linux
You need first to partition your hard disk. The single root partition is simple where we are going to create a root partition (l), a swap file and home partition
To create a disk, you need to type the following
Fdisk/dev/sda
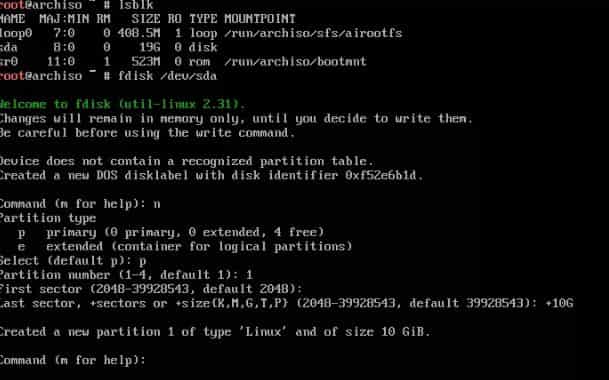
For new partition type n. You need to type p for primary partition and then select the partition number. The first selector has selected automatically therefor you need to hit enter. For the last sector, you need in the size you want to allocate. From home and swap create two more partitions then press w to save changes and then exit.
SEE ALSO: 8 Best Lightweight Linux Distros for Slow and Old PCs.
Creating a File System in Arch Linux
As we have created three different partitions next, we are going to format the partition and create a file system. For root and home partition, we are going to use mkfs, and for creating swap space, we are going to use mkswap. We are going to format our disk with ext4 file system
- mkfs.ext4 /dev/sda1
- mkfs.ext4 /dev/sda3
- mkswap /dev/sda2
- swapon /dev/sda2
We are going to mount these file systems:
- mount /dev/sda1 /mnt
- mkdir /mnt/home
- mount /dev/sda3 /mnt/home
SEE ALSO: 10 Ubuntu Terminal Commands and Shortcuts You Should Know.
How to Install Arch Linux 2022 (Step by Step Guide)
As we have created a partition and mounted it. Now let’s install a base package. The base package carries all necessary bags to run a system. A few of these are the GNU Bash shell, data compression tool, file system utilities, compression tools, C library, system utilities, Linux kernels and modules, library packages, USB devices utilities, vi text editor and much more.
Pacstrap/mnt base base-devel
How to Configure File Systems and Partitions in Arch Linux
You need to generate a fstab file to define how disk partitions, remote file devices, block devices are mounted into the file system.
- Genfstab –U /mnt >>
- /mnt/stc/fstab
Then change root into the new system, this shall allow you to change the root directory for the current running process and child process.
- Arch-chroot /mnt
Some of the tools that require an active dbus connection cannot be used inside the chroot; thus, it is better to exit from it. For this use the following command
- Exit
Setting Timezone
Use the following command to change the timezone in Arch Linux:
- ln -sf /usr/share/<zoneinfo>/<Region>/<City> /etc/localtime
To get a list of the zone, you need to type in:
- ls /usr/share/zoneinfo
You need to run hwclock to set the hardware clock:
- hwclock –systohc –utc
Linux Arch- Setting up Locale
The file /etc/locale.gen carries local settings and system language in the commented format. You need to open the file using vi editor and also un-comment the language that you like or prefer. We have done it for en_GB.UTF-8
Now you need to generate a local configuration in /etc. file directory using the following commands:
- locale-gen
- echo LANG=en_GB.UTF-8 > /etc/locale.conf
- export LANG=en_GB.UTF-8
Setting up Boot loader, Root Password and Hostname
You need to create a /etc/hostname file and add a matching entry to the host.
127.0.1.1 myhostname.localdomain myhostname
We are adding SecuredYou as a hostname:
echo SecuredYou > /etc/hostname
Then to the /etc/hosts file.
To install a boot loader, use the following commands:
- Pacman -S grub
- grub-install /dev/sda
- grub-mkconfig -o /boot/grub/grub.cfg
To create a root password in Arch Linux, you need to type
- Passwd
Then enter your desired password.
Once you are done, you need to update your system. The chances are that you already have an updated policy as you have downloaded the latest ISO file.
- pacman -Syu
You have successfully installed a minimal command line Arch Linux. BEST OF LUCK!!
How to Install a Desktop Environment (GNOME) in Arch Linux

You need to configure a network list before you install a desktop environment
See the interface name with the command below
Ip link
For us it is enp0s3
Then add the following entries in the file
vi /etc/systemd/network/enp0s3.network
[Match]
name=en*
[Network]
DHCP=yes
Now Save and exit. Then Restart your systemd network for the changes to reflect.
- systemctl restart systemd-networkd
- systemctl enable systemd-networkd
Then add the following two entries in /etc/resolv.conf file
- nameserver 8.8.8.8
- nameserver 8.8.4.4
Next, you need to install the X environment.
Then you need to type the following command to install the Xorg as the display server.
- pacman -S xorg xorg-server
Gnome has the base GNOME desktop. The gnome-extra contains GNOME applications, archive manager, disk manager, text editors and much more
- pacman -S gnome gnome-extra
In the last step, you need to enable the display manager GDM for Arch.
- systemctl start gdm.service
- systemctl enable gdm.service
Then restart your computer system and see the GNOME login screen
Note: Till now you would have realized that installing arch on your computer system is not an easy job. Installing Ubuntu is much more comfortable. You can surely succeed in this with a little patience and then proudly tell each and everyone that you use Arch Linux. The process to install Arch Linux is itself learning. You can keep on playing on this and see how powerful the Arch Linux itself is.
SEE ALSO: Top 6 Best GNOME Desktop Environments for Linux (Download).
Arch Linux Latest Download Requirements
- A x86_64 (i.e. 64 bit) compatible machine
- Minimum 512 MB of RAM (recommended 2 GB)
- At least 1 GB of free disk space (recommended 20 GB for basic usage)
- An active internet connection
- A USB drive with a minimum of 2 GB of storage capacity
- Familiarity with Linux command line.
Note: The above commands can be compiled into an Arch Linux installation script. This will execute all of those commands in one go.
Video Version of the guide
If you like to watch a video of the guide below is one:
Have you Installed Arch Linux?
I hope you enjoyed this guide as much as I enjoyed writing it for you. There are a lot of different steps detailed for you from teaching how to install Arch Linux, setting a root password, timezone and Arch Linux live USB.


")


Greetings and Salutations, my name is Thomas I am 66yr and going.
So Far this is the best article I could find on setting up Arch Linux, the reason is I have a Blind brother as a gift {Talk Arch}he gave me his broken laptop eMachines D650, i could fix laptop i run Manjaro linux on my own machine, first OpenBSD 6.6, then Mageia 6.0,7.1 not afraid to try something new.
eMachine Broadcom BCM4312 802.11b/g LP-PHY wifi PCIe card.
I got hold of the broadcom-wl-5.100.138.tar.bz2 driver and header file: Linux-a8cfc6044bde0d1894f19c20fbf889387b903742.tar.gz
a) I do not Know how to get the driver installed while installing from USB so as to get on to the net.
The rest I try to do
Thanks in advance Thomas
Hello Thomas,
Thanks for your feedback on the guide. I would first recommend you cd into the USB drive and looking at the file you have referenced above to install you will need to extract the contents first and then try to install it. Heres an example of how you can extract files: tar xvf ~/path/to/file.tar.gz then you might be able to run the install script.
Nice tutorial got arch installed now time to do so real work.
I want to try it, but unfortunately after spending 5 days browsing web, still I cant install arch linux, can boot or so, is not even a live medium for USB. What’s only work is that arch is properly on my USB stick.
Others linux distros I cant install easy(more then 250 distros tested last year).
So what is your recommendation please?
Hi Stanlez,
What issue are you facing? Can you please attach the error you are getting during the install process? Thank you